Circuit Diagram Led : How To Build An Led Circuit With An Attiny85 - Do you know all about a circuit diagram. Symbol definitions are as follows: Circuit diagram of leds in parallel. The final circuit in the simple led circuits tutorial is leds in parallel. This is a circuit diagram of digital dice which is nearly unbiased. As you can see the driver has nothing more than a lm317 ic and a resistor.
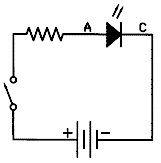
Are you interested in a circuit diagram? The circuit diagrams, or schematics, that follow are drawn using industry standard electronic symbols for each component. For more details visit simple basic led circuit Considering that the capacitor need to pass current in both directions, a modest diode is connected in parallel using the led to supply a path for the negative half. The way that the schematic symbol of the led maps to the physical led is shown in the diagram below:
Simple Basic Led Circuit How To Use Leds 4 Steps Instructables from content.instructables.com It shows the parts of the circuit as streamlined forms, and also the power and signal connections between the gadgets. You will see that at 3.0v, for example, this particular led will draw about 120 ma. Hello readers, we frequently add new circuit diagrams, so do not forget to come back often. Design circuits online in your browser or using the desktop application. The following circuit diagram shows you about how to powering a led (or two) from the 120 volt ac line applying | working with a capacitor to drop the voltage together with a little resistor to limit the inrush electric current. A monostable based tachometer using ic 555, and an led driver stage using ic lm3915. The easiest way to get a light to blink (or at least the easiest to understand) is the following: This circuit doesn't have any working process it is powered by a 9v battery.
Making led projects provides a lot of fun and knowledge in the field of electronics, there are many types and colours of leds are available in the markets and their usage is growing day by day.
When you are operating an led with 3v you have to use minimum 10 ohms resistor. It looks similar to the diode. Circuit diagram of leds in parallel. To understand the circuit you need to understand how a relay works. It's likely though, you've already read the wikipedia page about series and parallel circuits here, maybe a few other google search results on the subject and are still unclear or wanting more specific information as it pertains to leds. The circuit basically consists of two mains stages. Referring to the figure below, the left side stage consists of a ic 555 monostable stage which triggers to the input frequencies from a. The schematic diagram of a simple led flasher circuit is given below. If we decrease the voltage to 2.9v, the led will draw a bit less, only about 80 ma. Circuit diagram is a free application for making electronic circuit diagrams and exporting them as images. Symbol definitions are as follows: A simple 10 led tachometer circuit can be seen in the above diagram. Hence the name, light emitting diode (led).
The led symbol is the standard symbol for a diode with the addition of two small arrows denoting emission (of light). You just need to connect positive terminal of led with the one end of resistor and then connect another end of resistor with the positive terminal of battery. The above circuit is designed to drive a led with 0.2a. A monostable based tachometer using ic 555, and an led driver stage using ic lm3915. A simple 10 led tachometer circuit can be seen in the above diagram.
Simple Led Circuit from www.electroschematics.com By using this circuit, there is no chance to cheat as the circuit operates at such a high speed that the circuit is almost imperceptible to the human eye. When you are operating an led with 3v you have to use minimum 10 ohms resistor. The circuit basically consists of two mains stages. The circuit must provide sufficient current to light the led at the required brightness, but must limit the current to prevent damaging the led. The circuit diagram for leds in parallel connection is shown in the following image. Circuit diagram is a drawing of components and parts of an electronic circuit. On the physical led, the longer lead (or leg) of the led is the anode. Symbol definitions are as follows:
Referring to the figure below, the left side stage consists of a ic 555 monostable stage which triggers to the input frequencies from a.
If we decrease the voltage to 2.9v, the led will draw a bit less, only about 80 ma. To understand the circuit you need to understand how a relay works. By using this circuit, there is no chance to cheat as the circuit operates at such a high speed that the circuit is almost imperceptible to the human eye. The above circuit is designed to drive a led with 0.2a. The circuit basically consists of two mains stages. Practical led indicator and flasher circuits. Unbiased digital dice with leds: This clock signal goes into the clock input of the ic 4017. A monostable based tachometer using ic 555, and an led driver stage using ic lm3915. Sometimes you need to know which wire/node is positive polarity and which wire/node is negative polarity.the led as a polarity indicator circuit is show in above diagram. For more details visit simple basic led circuit A wiring diagram is a simplified standard pictorial representation of an electrical circuit. And the only way to change the.
It looks similar to the diode. Sometimes you need to know which wire/node is positive polarity and which wire/node is negative polarity.the led as a polarity indicator circuit is show in above diagram. If you draw the circuit, if the actual shape, it wastes so much time, symbols should be used. The circuit basically consists of two mains stages. The most widely used of all optoelectronic devices is the simple led (light emitting diode), which emits a fairly narrow bandwidth of visible (usually red, orange, yellow, or green) or invisible (infrared) light when its internal diode junction is stimulated by a forward electric current.
Led Circuits from www.ngineering.com 9 volt basic led circuit with 470 ohms resistor. Then, look at the symbol of led compared with a normal diode. This clock signal goes into the clock input of the ic 4017. Simple led circuit diagram here is the circuit diagram for simple led circuit. In the diagram as you can see two led's are placed in opposite directions so when one led is on the other led will be off. To understand the circuit you need to understand how a relay works. For more details visit simple basic led circuit Are you interested in a circuit diagram?
These capacitors are connected line to line and are designed for high voltage ac circuits.
Circuit diagram is a drawing of components and parts of an electronic circuit. You just need to connect positive terminal of led with the one end of resistor and then connect another end of resistor with the positive terminal of battery. Some circuits would be illegal to operate in most countries and others are dangerous to construct and should not be attempted by the inexperienced. Design circuits online in your browser or using the desktop application. By using this circuit, there is no chance to cheat as the circuit operates at such a high speed that the circuit is almost imperceptible to the human eye. For more details visit simple basic led circuit The most widely used of all optoelectronic devices is the simple led (light emitting diode), which emits a fairly narrow bandwidth of visible (usually red, orange, yellow, or green) or invisible (infrared) light when its internal diode junction is stimulated by a forward electric current. If we decrease the voltage to 2.9v, the led will draw a bit less, only about 80 ma. This is a circuit diagram of digital dice which is nearly unbiased. This current rating is fixed by the resistor r1 in the circuit. So click here to visit the article. But if you want to use leds in any way it is better to connet or wire them in right way. It shows the parts of the circuit as streamlined forms, and also the power and signal connections between the gadgets.